Boost lab productivity
How to transition from manual pipettes to automated liquid handlers
Introduction
Great, you’re starting to think about leveling up your manual pipetting experiment using an automated pipetting robot. Now you will need to start thinking a little differently. Much like growing up, the transition process can seem scary, but speaking as somebody who has been through that learning curve, you will be so glad you did.
Here are some considerations to start you on your automated pipetting journey.
Labware changes
Often we forget to consider labware when introduced to automation. A common mistake is just continuing to use whatever you’ve used manually. Here are some examples of changes that make automated life much easier.
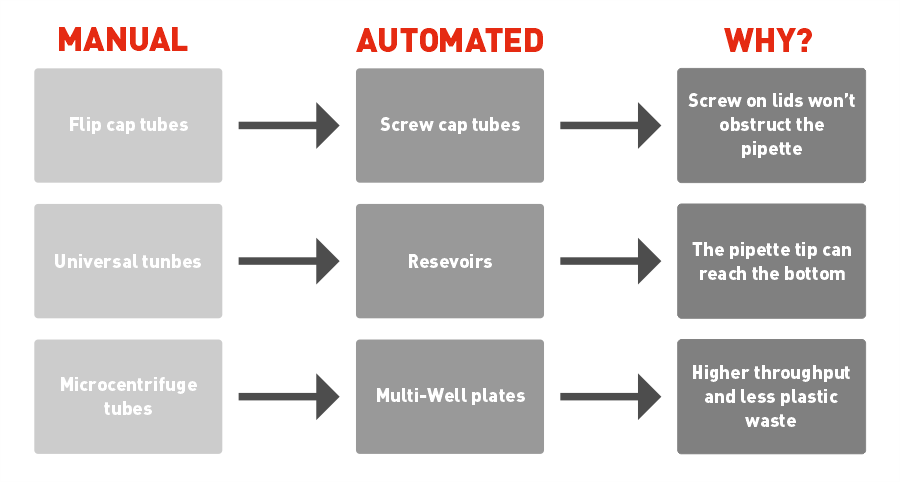
Another consideration when using any automated device is whether it is possible to reduce the volumes you use in your experiment (assay miniaturisation). This will reduce your resource use, making the funding go further!
Reducing your volumes also makes using multi-well plates an easier option. You need only place one piece of labware on the deck, rather than using an adapter and multiple tubes (amid double checking their placement). But choosing the best-shaped well/tube-bottom is also important.
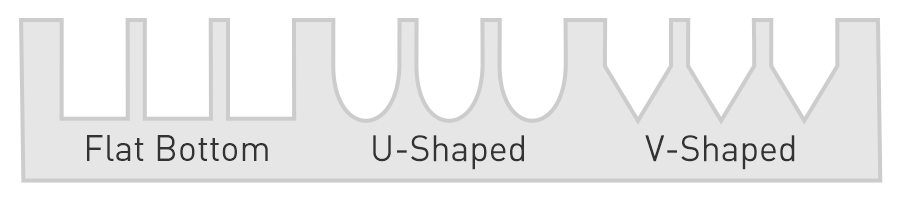
The flat bottom is a good all rounder and essential if you intend to use a spectrometer in your experiment. But the V-shaped base is better for lower volumes as the edges cause the sample to pool in one centered location (a quick blast in the centrifuge also helps). The U-shaped well improves automated mixing because its curved sides create fluid motion that ensures a uniform solution throughout.
With a manual pipette, you can stir in circles (as well as aspirating/dispensing), or move the tip to the corner where a small sample has gathered. If using an automated pipetting robot, like SQWERTY, adjustments must be made to simulate these benefits.
Be consistent in your labware, that way you don’t need as many ‘Object files’ and there are fewer parameters to juggle when you troubleshoot.
Consider your liquid handling options
There are many kinds of automated pipette, each with its own benefits. The larger floor-standing liquid handlers are good for highly-repetitive, high-throughput workflows but are inflexible, impractical, and avoided for simple experiments or R&D. Electronic pipettes are an improvement on their manual counterparts, but still see you spending hours hunched over the bench. Bench-top pipetting robots are a fantastic introduction to the world of automated liquid handling: flexible and easy-to-use, ideal for automation of smaller-scale experiments, like plates for PCR reactions or cell culturing.
Jump right into SQWERTY
The best way to learn the basics of automated liquid handling is to start using something user-friendly. We know that the SQWERTY software is built with ease of learning in mind. It’s the starter Pokémon of automated liquid handling, because everyone knows you start with Tackle, not Draco Meteor.
Try creating your first workflow using SQWERTY’s Guided Transfer operation. Progress to interactive mode to discover all the workflow optimisation adjustments possible. Start by using water and just have fun with it. When you think you’re ready – try the advanced operations where every aspect is under your full control. No doubt the first few workflows will contain some mistakes, but mistakes are how we learn.
Time to level up
Once you have your workflow sorted you will be understandably excited to get the best out of your new pipetting robot. First bit of advice before optimising your workflow – learn the theory. A little knowledge will go a long way. For example, highly viscous liquids need a big blow out, but more fluid substances need an air gap instead. Ask yourself questions like: is reverse pipetting or forward pipetting more appropriate here?
Use this knowledge to start playing around with advanced parameters and liquid classes to create a workflow optimised for your needs.
You should also start to consider: what is your goal for this particular automated workflow? Do you want the best volume accuracy possible? If so you’ll need to set aside some time prior to your experiment to optimise the liquid classes and advanced parameters. The investment is worth it because once you’re done, your pipetting robot will repeat it exactly every time with humanly impossible consistency and accuracy.
On the other hand you might have a super simple workflow that only needs a mediocre level of accuracy but you’d prefer it to be quicker than the previous (highly accurate) workflow. Increase the flow rates, reduce the dwell time and use the multi-dispense operations.
Are you ready for it?
I think you are, perhaps more than you know. You’ve learnt the theory and you’re starting to build more complicated workflows. Perhaps you’re already using your pipetting robot for its ultimate use? Making cocktails of course! But make sure your PI doesn’t see. Jumping right into automation and learning from your mistakes is key to success in this new generation of pipetting.
“When the student is ready the teacher will appear. When the student is truly ready… The teacher will disappear.”
Tao Te Ching
Feeling overwhelmed by the liquid handling lingo?
Get back to basics and explore the theory of liquid handling.
Fiona Kemm MRes| Scientist
Fiona is a vital member of our Research team, rigorously testing our robots to ensure scientists don’t break them. With no prior robotics experience, she was the ideal guinea pig for our world-class user experience and support. Holding a BSc in Biochemistry and an MRes in Molecular Microbiology, Fiona brings extensive hands-on expertise she applies across departments, supporting both users and internal teams. From writing insightful web articles to specialising in SQWERTY, Fiona ensures our innovations perform flawlessly, helping customers focus on the creative and interpretive aspects of science that can’t be automated.