How to optimise your liquid handling workflow using SQWERTY
1. Learn the theory
Get the best out of your SQWERTY workflow by applying a light touch of big brain energy. Here’s some direction to get you started.
Making informed decisions about liquid classes and workflows becomes so much easier when you really understand the theory behind them. Start by having a clear understanding of your goal. Are you willing to sacrifice speed for the sake of great accuracy? Or is your priority just getting a similar volume in each target without creating a mess?
If you know a little bit about fluid dynamics, it can really help. It’s all about grasping how adjustment of your automated workflow settings will impact different types of liquids. For example, handling highly viscous liquids can be tricky—they move slowly and tend to be quite adhesive. To work with them effectively, you need to be mindful of settings like immersion depth, use a reverse pipetting technique, and above all, move slowly. Knowing these details makes all the difference!
2. Liquid classes
Apply your manual pipetting knowledge with what you have learnt of fluid dynamics theory and write it into the SQWERTY software. Create a series of liquid classes with adjusted settings, guided by your professional judgement, and take the accuracy and precision of your workflow to the next level. For example, reducing the aspiration flow rate gives glycerol time to flow at its own pace, but the best flow rate depends on the fluid concentration and temperature. Use SQWERTY’s interactive mode to experiment, after all isn’t that why you became a scientist?
This is a great opportunity to impress your PI by using Design of Experiment (DOE) principles since you have so many levels to play with for each liquid class setting. DOE will help you systematically explore how these variations impact your outcomes, making your experiment both efficient and insightful!

3. SQWERTY ‘Interactive’ mode
Interactive mode allows you to quickly program individual transfers of liquid. All the benefits of automated liquid handling without the hassle of designing a full workflow.
Use ‘Interactive’ to transfer three replicates with each of your liquid classes (including the water default) in the volumes of your intended application. Do the same transfer as accurately as you can with a calibrated manual pipette. Use the manual and the water default test transfers as visual controls to compare your liquid classes against. Discount any liquid classes that dispense anomalous volumes, this should narrow down the field of play.
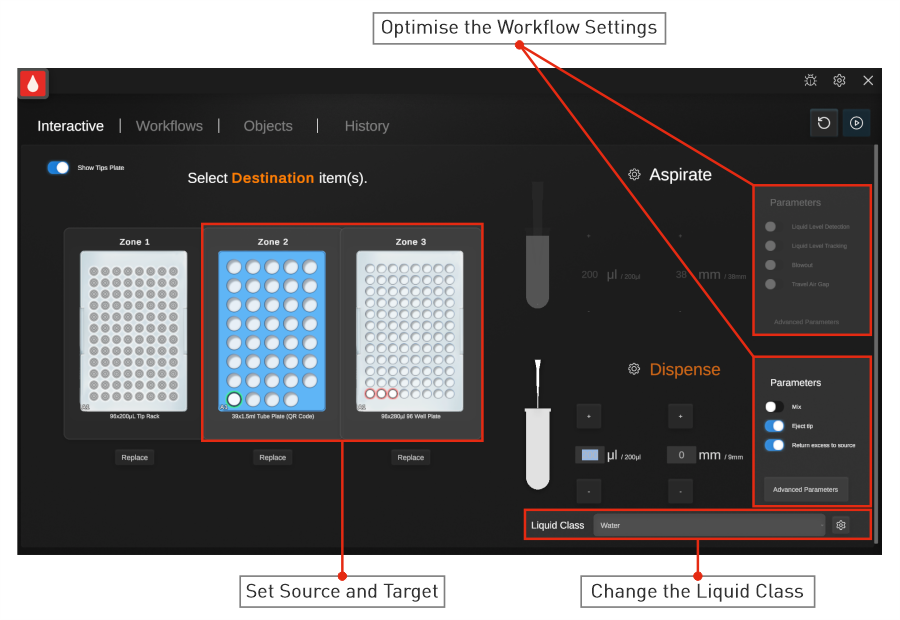
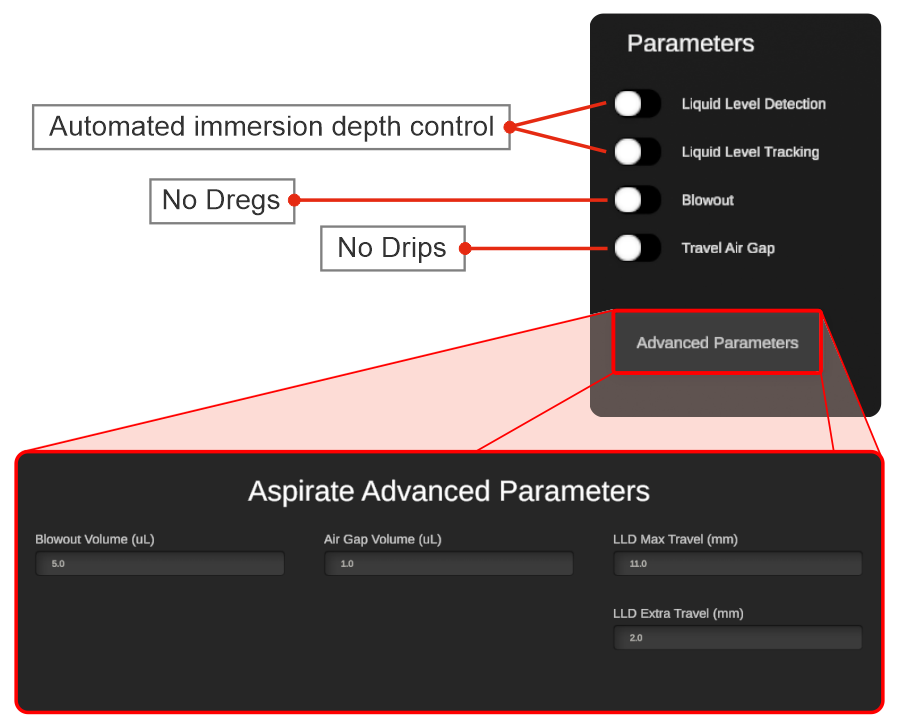
4. Advanced parameters
Not only is interactive mode perfect for trivial transfers, but it’s exactly the tool you need to optimise the workflow settings. These are important decisions that will define whether your ultimate workflow is designed for the best accuracy, or highest speed.
Observe the entire workflow, not just the end result.
- Is there dripping? Add an air gap – a small buffer of air between the liquid volume and the pipette exit. A greater volume is more effective, but reduces the maximum tip volume capacity (the same goes for the blowout).
- A blowout will force any remaining dregs from the pipette tips, ensuring the full volume of the liquid is dispensed.
- Is liquid level detection (LLD) and liquid level tracking (LLT) appropriate? Having them enabled will slow the speed of aspiration compared to manually setting the aspiration/dispense depth, but would result in less liquid adhering to the outside of the pipette tip if your fluid is particularly vicious. This is because liquid level detection uses pressure-based sensing to determine the optimum insertion depth.
- Is reverse pipetting (aspiration volume > dispense volume) or forward/direct pipetting (aspiration volume = dispense volume) your best option? For a very low-viscosity liquid, using direct pipetting may be better as there is less risk of the liquid adhering to the pipette tip and reducing the volume actually dispensed. There is a greater risk of this in a viscous liquid, so reverse pipetting would be more advisable to ensure your intended dispense volume is actually achieved. For example, if you aspirate 200 µL 80% glycerol and then dispense the same volume, some of that 200 µL aspirate will remain stuck within the pipette tip, making the final volume dispensed less than 200 µL.
- Consider how many pipette tips you will need. Should the tip be ejected after each transfer, or only after the last transfer? Generally, the tip should be ejected every time for the greatest volume accuracy, but this will increase the resources and time required for each workflow if they don’t require a high level of volume accuracy.
- Should you be performing a pre-wet step (pre-wetting the tip)? This will be super important to volatile liquids or those of a different temperature to the room. A pre-wet step acclimatises the pipette tip to the conditions of the liquid it’s transferring and results in greater accuracy. SQWERTY’s guided multi-dispense operation automatically adds this. If you are ejecting your pipette tip after each transfer, the pre-wet step would double the total time taken for the workflow.
5. Create a really simple workflows
Design a really simplified version of your workflow. Apply all you have learned from your time on interactive mode. Use the guided operation if you’re less confident and the advanced version if you’re more confident. Just a simple transfer/multi-dispense of one liquid into multiple replicate targets. Create a couple of versions with your best setting combinations if you haven’t decided on a favourite yet. Run these workflows on SQWERTY and start to actually quantify the accuracy.
6. Get some accuracy data
Start with weight change to get a total volume transferred after the entire workflow. Remember to take fluid density into account, unlike water, not all liquids are 1 mL= 1 g. If you have a spectrometer and you’re using a flat bottom multi-well plate, then use that to get some per-well data. It won’t tell you what volume is in each well, but it will allow you to compare each well to the average for a better idea of consistency.
Analyse this data and come to a conclusion as to whether this is the right balance of time and resources to accuracy. Which combination of liquid class and operation design suits your needs the best? If necessary, return to the workflow design, adjust it and re-analyse it until your requirements are met. It is often useful to compare your SQWERTY workflow to a manual version to get some perspective at this point.
At the beginning of your SQWERTY journey, this step may take a bit of time, but as your understanding and library of pre-tested liquid classes increases, you will find the entire process smoother.
Struggling with a specific workflow?
Our in-house team of application specialists will help you optimise your workflow and make you a SQWERTY expert in no time.
Fiona Kemm MRes | Scientist
Fiona is a vital member of our Research team, rigorously testing our robots to ensure scientists don’t break them. With no prior robotics experience, she was the ideal guinea pig for our world-class user experience and support. Holding a BSc in Biochemistry and an MRes in Molecular Microbiology, Fiona brings extensive hands-on expertise she applies across departments, supporting both users and internal teams. From writing insightful web articles to specialising in SQWERTY, Fiona ensures our innovations perform flawlessly, helping customers focus on the creative and interpretive aspects of science that can’t be automated.